Sunday, July 26, 2015

I did it....

Good Morning Little Butterflies,

     So, I'm not sure if any of you read yesterday's blog, but I was a little angry.  I hate it when people make vague statements after complaining about how miserable they are.  Grow a set already.  Anyway, after work yesterday (I work on the weekends), I went to one of the local craft stores, grabbed a few supplies, and headed home.  I was still feeling a little grumbly.  So I walked the fur babies, changed my clothes and oddly enough, cleaned the bath tub (NO idea why).  By this point, it was almost 7 pm and all I wanted to so was lay in bed.  But here's my dilemma, I'm afraid if I go back to just laying down as soon as I get home from work, I will go back into the pattern of doing nothing all day every day thus thrusting myself into a weird self imposed depression.  That's not going to work for me any more.  After the amazing week I had last week of crafting and working on projects, I did it.  I made myself get up, get my supplies together and work on SOMETHING.  I'm going to try to work on something every day.  Be it at work when I get bored, at home after work or when I'm at moms.  Unfortunately, some of these projects I worked on last night are unfinished.  Why?  Because it takes several steps.

     So, here we go.  Again, the light in my craft room is so bad.  so forgive some of these pics.  It's just a pain in the ass to have to do a step in a craft, then run to a room with good lighting to take a pic.

As always, the EoL.   
     So, I started, as always, by gathering my supplies.  Because I'm working with several crafts today, there is a long list of things I used.


We have some Mod Podge Molds on the left.  Across the top we have Podgeable glitters and drizzles.  Bottom right we have a pretty plywood cut out, chalkboard paint and my paint palette.

At the very top be we see the Mod Podge melts, which is like meltable plastic that goes in the high temp hot glue gun.  We also see the glittery glue sticks.  Why?  Well, I figured I would try to use them with the molds but never quite got around to it.  tonight maybe.  Bottom right corner, is the clean water for my paint brushes.

Got this container at the home builder store.  I got it in the paint section along with the lid and I LOVE it!  I always try to use smaller containers and I always end up knocking it over (my name should have been Grace I tells ya), the brushes are too long, just a nightmare. 

Closer look at the plywood piece and paint.  

     Ok let me stop here just for a second.  In case you had no idea, I LOVE CHALKBOARDS!  Like seriously, I'm not sure why.  Maybe it's a childhood thing, who knows.  And once I found chalkboard PAINT?!  FORGET IT!  I've created several.  I love love love them!  I've made ones in cup cut outs, teapot cut outs, anything I can get my hands on.  Of course, those are all at Mama Pixie's house....How the hell did she get them all?! 


     Molds for the Mod Podge melts.  The center one is my newest one and it's called, Trinkets.  And hello!  Skull and Crossbones with a BOW!  (I am Pirate at heart)


          Paintbrushes of all kinds.  


AGAIN with the sparkly glue.  I have to find something to do with this stuff!


     Ok so below, you will see where I started to fill the cavities of my molds.  So, in an experiment, I put the drizzle stuff in some of the Trinket molds. Why?  To save myself on painting time I guess. We'll see how that worked out when I get home tonight. But in the other two molds, I used the plain white Mod Podge melts.  (I didn't use any other colors because when I bought the melts originally they only had white and clear.  Now they have a bunch of different colors.  So, maybe when those go on sale...)  The good thing about the regular melts is they cool and are ready in about 15 minutes, depending on the size of the item you've decided to mold.  


Can you see the skull and crossbones outline up there? 


      Well, sorry for the horrid picture but below, you see some of the plain white items I molded.  They need to be trimmed, shaped and painted.  (I wonder if I have tiny scissors somewhere?)


     Also last night, I worked on a chunky ring, jewelry project thing.  I had a bunch of ring blanks  (all pics of those came out terrible!)  so I've been gluing little cabochon things to them like roses and a miniature teacup and saucer.  So I had some of these red heart stones you get in the bags, like table scatters or something and I glued some to the ring blanks to see what they would look like.  


Here they are, upside down in the wells of my palette drying.  
     So, tonight, when I get home, I will check on my molds, see if the rings held together ok, and finish embellishing my new chalkboard.  You didn't think I was just going to leave it like that did you?

Drying so I can embellish it tonight! 

There you have it Butterflies, 3 or 4 (How many was that?) projects that I am working on in my teeny badly lit craft space.  Is there anything you would like to see me try?  As long as it is within reason, I'm up for pretty much anything craft wise.

Until tomorrow's post.  

Love and Peace my Little Butterflies, 

Pixie

Saturday, July 25, 2015

Break from Crafting for a Sec

Hello Little Butterflies,

    I feel like I should make a blanket warning about a few things.

1) All my opinions are my own.  If I say I like something, it;s because I've used to and it's pretty damned awesome.  If I don't like something, you can guess it;s pretty much the same thing.  I am not compensated for any of my opinions so there you have it.

2) If we are friends, please know that I will always tell you the truth.  It may be hard to hear sometimes but yes, I will always be brutally honest and tell you the truth.  You can't be angry for me for being honest.

3) If I give you advice, it's because I care.  Not because I;m being a bitch or whatever else you may think.  But if you are going to go back and do exactly what it is you asked me advice about, you can't expect me to continue to care.  If you don't like your situation, change it.

More tonight when I'm not feeling so morose.

Pixie

Wednesday, July 22, 2015

Floral Monogram

     Hello my Little Butterflies!  Last night, I did a new craft.  Something I saw on Pintrest and fell in love with.  I went out, got the supplies... and promptly set it aside.  I'm not sure why, but there you have it.  So, because I've been feeling inspired lately, I decided to grab the MDF letter and the flowers and give the Floral Monogram a try.  Lots of pics to follow so, bare with me.
    
     I started, as usual, with gathering my supplies.  They included silk flowers in different colors and sizes,  the regular glue gun and a "good sized" MDF letter.  (Pics 1-3)

Look at all the pretty flowers!

The regular glue gun. 

Now, I'm pausing here for  second or two for an explanation.  You see, yesterday, I was going on and on about how much I loved my Cool Tool low temp glue gun.  So why today, am I using the old molten lava glue gun you are asking?  Well, the explanation is simple.  I have a ton of glue sticks for this one and the ones for the Cool Tool only come 15 to a pack and are a little more expensive.  In a nutshell, I'm cheap.  Ok let's call it thrifty instead.  Oh and as to why the letter K?  Simple, my first name and my married last name both start with the letter K.  Thank Badness my middle name isn't Katherine.  I'd  be the KKK!  Not good!  Anyway back to the craft here.

The letter "K" (10 inches) and for some reason my sparkly glue sticks.  For no reason more than because, I has sparkly glue sticks!
So, I began with pulling my large flower off the stem. I always save the leaves too because you never know when you might need them.  You'll see later.

My first flowers and the empty stem.

Save those leaves!


THE EOL !!!!!!!! (The Elixir of Life for you new butterflies)

Here you can see where I trimmed he little nubby off so it lays flatter on the MDF when you glue it.

Beginning the gluing.  I began with a large flower to start with.


Here it is when I first started gluing.
      OK, remember when I told you to save those leaves?  You can see where I added leaves after finding GAPING holes where you could still see the MDF.  I trimmed them up, pulled up petals that were not glued down and slipped them in, gluing them to keep them in place.


About half way done.


3/4's of the way through.

And it's DONE!
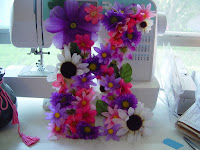
 Betcha can't tell what my favorite colors are?  So I love the way you can still tell it's a K but it looks like it's been taken over by wild flowers.  Now I just have to wait for Hubby Bubby to put something on the back so I can hang it.  I have to admit, I'm pretty impressed with myself and the craft.


Enjoy everyone and thank you  all for inspiring me to not only craft again but to write again as well.
Peace and Love My Little Butterflies,

Love,

Pixie  

P.S.  I know your wondering if I burned myself with the glue gun.  YOU BET YOUR ASS I DID! 

Tuesday, July 21, 2015

BONUS Post

Why Hello again My Little Butterflies!

I'm inspired today I supposed because I turned this.....


Into these ^^^^!!!

     It's part of my Halloween costume.  I needed some funky earrings to go with my creepy doll costume.  So yeah.  Still planning on working on the other craft tonight as long as I;m not exhausted later.

I've shown you mine, now show me yours! 

Love, 

Pixie

LOOKIE WHAT I MADE!!!!!

Morning My Little Butterflies.  Wait...TWO Blog posts on the same week, two days in a row?!  WHAT?!  What is happening right now!  What's happening is I promised I would take pics and show you my new pattern weights.  And I always try to keep a promise.  So, here we go.  Forgive the photos.  The lighting was "off" in the room.  I couldn't get the right balance of light and color to make the images pop.  A little disappointed in that because I feel I take really good pics.  Anyway, Here we go.


So I gathers my supplies together, (the first 4 pics) and sat down at my sewing table to get to work.  You can't see it in the pictures, but I did lay down a sheet of wax paper to keep the glue from sticking to anything I didn't want it too and for easy clean up.  (I also do that when I'm painting or working with clay.)
Here you see the washers all in the bag.  

Here are my other supplies.  They include the afore (oooooooh fancy word!) mentioned washers, 4 rolls of ribbon, the Cool Tool glue gun and the glue sticks.

THE ELIXIR OF LIFE!!!!

My listening pleasure.  Yes I listen to old Horror movies while I craft....What?

      I started by stacking my washers in 4 groups of 4 for a total of 16.  Once my glue was "hot" I started gluing the first two together. Let me pause here and tell you how much I love my Cool Tool glue gun.  Don't get me wrong, I have other glue guns.  I use them, but I don't love them.  See, here's the thing.  I'm accident prone.  I trip over things that aren't there, I fall going up stairs and bump into anything and everything.  I also, burn the ever living SHIT out of myself on hot glue guns.  Nothing puts me in a bad mood and want to say the F word in front of Mama Pixie (AHHHH no we just don't do that)  FASTER  than burning myself on a GD glue gun.  So the Cool Tool is really great.  The glue does come out hot but not molten lava hot.  The only problem with it (which really isn't a problem) is you have to work fast with your project.  Now, with the washers being stainless steel, it cooled the glue off even faster so that was a race against the clock to get the glue placed, snap the picture and slam the other washer down before it got too cold to work with.

See?  In the back right corner of the photo? That's a stack of 4.


UGH SO BLURRY!

Bad Picture BAD!

     So, I actually tried putting the ribbon on two ways.  In the first way, I glued three of the washers together, then glued down a piece of the ribbon and glued the last washer on top thus wedging the ribbon between the 3rd and 4th washers.  The other way I did it, was I glued all the washers together then glued the ribbon to the top before wrapping the washers.  I have to say, I preferred the sandwiching method better.  The bond just felt so much better to me.

Before adding the 4th washer. 

It's a ribbon and washer sammich!

From  another angle.

Two done! 
     Ok I goofed up here.  I meant to post pictures of the actual wrapping process but got so excited when I finished two I blazed right through them.  And that's when Hubby Bubby spoke up...more on that in a sec.  So what I actually used are the mini spools of ribbon you get for like 99 cents at the fabric stores.  Four of those (full spools) were the perfect amount to wrap my washers.  I basically glued down a piece then wrapped it through the hole, under and back up, scootching over a bit every time so the ribbon overlapped just a smidgen ever time.  Turn the washer stack, repeat.

Hubby Bubby talks to GD much LOL.

     So, I've got four beautifully wrapped stacks for use as pattern weights.  I'm showing them off to Hubby Bubby and he says, "You know what would be a great idea?  Put felt on the bottoms so nothing gets snagged on the ribbons and it will glide over the fabric when you move them.  You have felt somewhere right?"  You bet your sweet ass I have felt in every GD color.  I found a piece that I have already been cutting pieces out of (cause I'm cheap and didn't want to ruin a new piece), I traced all four of my weights (no idea why I had to trace all of them.), cut out the felt, and glued those suckers to the bottom of the weights.

Hubby Bubby and his great ideas.....

The front left is a pink argyle ribbon and red roses on the right.  

The back two are purple (left) and pink (right) ribbons that say princess with crowns.  (Just in case there were any doubts.)

OH HEY Bottom center, that blue bit is the tape where I put down the wax paper.

Ready for action!

       See this up here^^^?  


     Yup those are my custom made pattern weights.  It took me just about an hour and a half what with the gluing and the pictures and all.  Once I got the hang of wrapping them, that part took no time at all. 

    I hope I've inspired you all.  Tonight, perhaps there will be another craft in the works!  We shall see.

  Have a Great Day My Little Butterflies, 

Love, 


Pixie

Monday, July 20, 2015

SO....You want to make an adult sized Pettiskirt?

Hi Kids.

Yeah I want a pettiskirt.  Yes I know I can buy one.  In fact I have one.  But no it's not what I want.  I want what is referred to as a CUPCAKE pettiskirt.  You know, like in those kid pageant shows?  Yeah....BIG and POOOOOFY!!!!!!

As many of you know, I'm a bigger girl.  Hey, no T, no Shade just pink lemonade Honey. I love my curves!  But it is hard to find a "standard" pattern for a Unique Body.

So first I tried making my own tutu.  SO much fun!  You literally can make this in ANY size and length. Longer tulle lays flatter giving you the actual skirt look.  Shorter pieces stick straight out more so you get more of a tutu effect.   It's got minimal sewing and the cutting the tulle is the hardest part here.  Gets a little tedious with tying the tulle on, but really, not hard.

Anyway, I've researched like crazy and made tons of notes from all kinds of websites and am getting ready to get started.  I'm hoping to blog about this the entire journey so forgive me if I ramble.

Part 1.  "So you need pattern weights"

     Ok, ok, you don't "NEED" pattern weights.  But having worked with pattern weights before.  I can safely say, they are the BEST!  If you know me, you know the worst part of any sewing project for me is the endless (and I mean ENDLESS) pinning and cutting.  I am so paranoid about making the wrong cuts that I end up using twice as many pins in my pattern pieces.  And those are called GD perforations!  Weights will give you the same holding power with less effort.  I love weights.

     So, here's my problem.  I had these great weights and left them at Mama Pixie's house.  Yeah they're hers now.  And that's fine.  I love my Mama Pixie and Damn it I came outta her vajayjay....she wins.

     To make a long story short (TOO LATE), I need new weights.  I found some instructions on how to do this on pintrest with good sized washers.  OFF I went to THE HOME IMPROVEMENT STORE! Since I know NOTHING about this stuff My ManCub (that's Hubby Bubby to the rest of you.) met me there.  After looking like a lost little lamb in the store (not kidding like 3 of the male workers stopped to ask me what I was looking for.) he found me and came to my rescue!  He knew exactly what to pick up, how many I would need and put them in a bag for me.  So, for less than $7, I had the pricey part of making my own weights.  Ok so I didn't leave for that amount, it was more like $13.  WHAT?!  They had stuff!!!!

     Side note here:  I'm not a big fan of dirt and grime on my hands.  I'm a bit of a germaphobe and you will see me wash my hands and use antibac stuff all the time.  So here I am in the Home Improvement store like wigging (people still say that right?) about the washers being all dirty and grimey and stuff.  Hubby is like laughing at me and says "You are so the wrong person to have in this store"  Well shit, everything has a film of dust, grime and dirt on it, AHHHHHHH and 2) is it a rule that those stores MUST be kept at about 80 bajillion degrees (all measurements of heat are not necessarily accurate) in those stores?  IN FLORIDA?!?!  Holy Balls I about burst into flames!!!!

    So tonight, with camera in hand, I'm hoping to make and finish 4 home made patterns weights. And this is before I even start cutting and sewing the pettiskirt.

     How do I get myself into these things?

Love and Peace my little Butterflies,

Pixie